
You reach for a refreshing sip of water during a long hike, but instead, you're met with a strange, plastic aftertaste and the sight of dark spots in your drinking tube. It's a frustrating reality for many of the 175.8 million people who hit the trails each year. We've all been there, struggling with a reservoir that refuses to dry or a bite valve that smells "off" after a weekend of use. Learning how to clean hydration pack components is the only way to ensure your water stays as fresh as the mountain air.
It's true that keeping a hydration system pristine feels like a chore, especially when you just want to get back outside. We promise to change that by teaching you the professional steps to eliminate mold, odors, and bacteria. You'll learn how to sanitize every component; discover faster drying methods; and find out how to keep your Hydration Backpack Vest in peak condition. It's about safety, fresh taste, and gear that lasts for years.
Key Takeaways
- Learn why standing water creates biofilm and how to protect your health from hidden bacteria.
- Discover the most effective household and specialized supplies for how to clean hydration pack components safely.
- Master the step-by-step disassembly and soaking process to eliminate "old plastic" tastes and deep-seated odors.
- Use simple household items as spacers to ensure your reservoir dries completely and stays mold-free.
- Get expert tips on maintaining your Hydration Backpack Vest fabric to keep your entire system fresh and comfortable.
Why Regular Hydration Pack Maintenance is Essential
Cleaning your gear might feel like the least adventurous part of your weekend. However, it's the difference between a crisp, refreshing sip and a mouthful of swamp water. When you master how to clean hydration pack systems, you aren't just tidying up; you're performing essential health maintenance. A neglected reservoir quickly becomes a breeding ground for invisible guests that can ruin your next trip.
Regular care also eliminates that frustrating "new plastic" or stale water taste. We've all experienced water that tastes like a chemical factory after sitting for just a few hours. Proper maintenance removes the manufacturing residues and prevents the metallic tang of old water. It ensures your hydration stays as pure as the source you filled it from.
The Science of Biofilm and Bacteria
Inside that dark, damp reservoir, standing water creates a perfect bacterial playground. Moisture trapped in the drinking tube or the corners of the bladder quickly turns into a slimy substance. You might notice your bladder feeling slippery or looking slightly cloudy. These are the early signs of contamination that happen long before you see black mold spots.
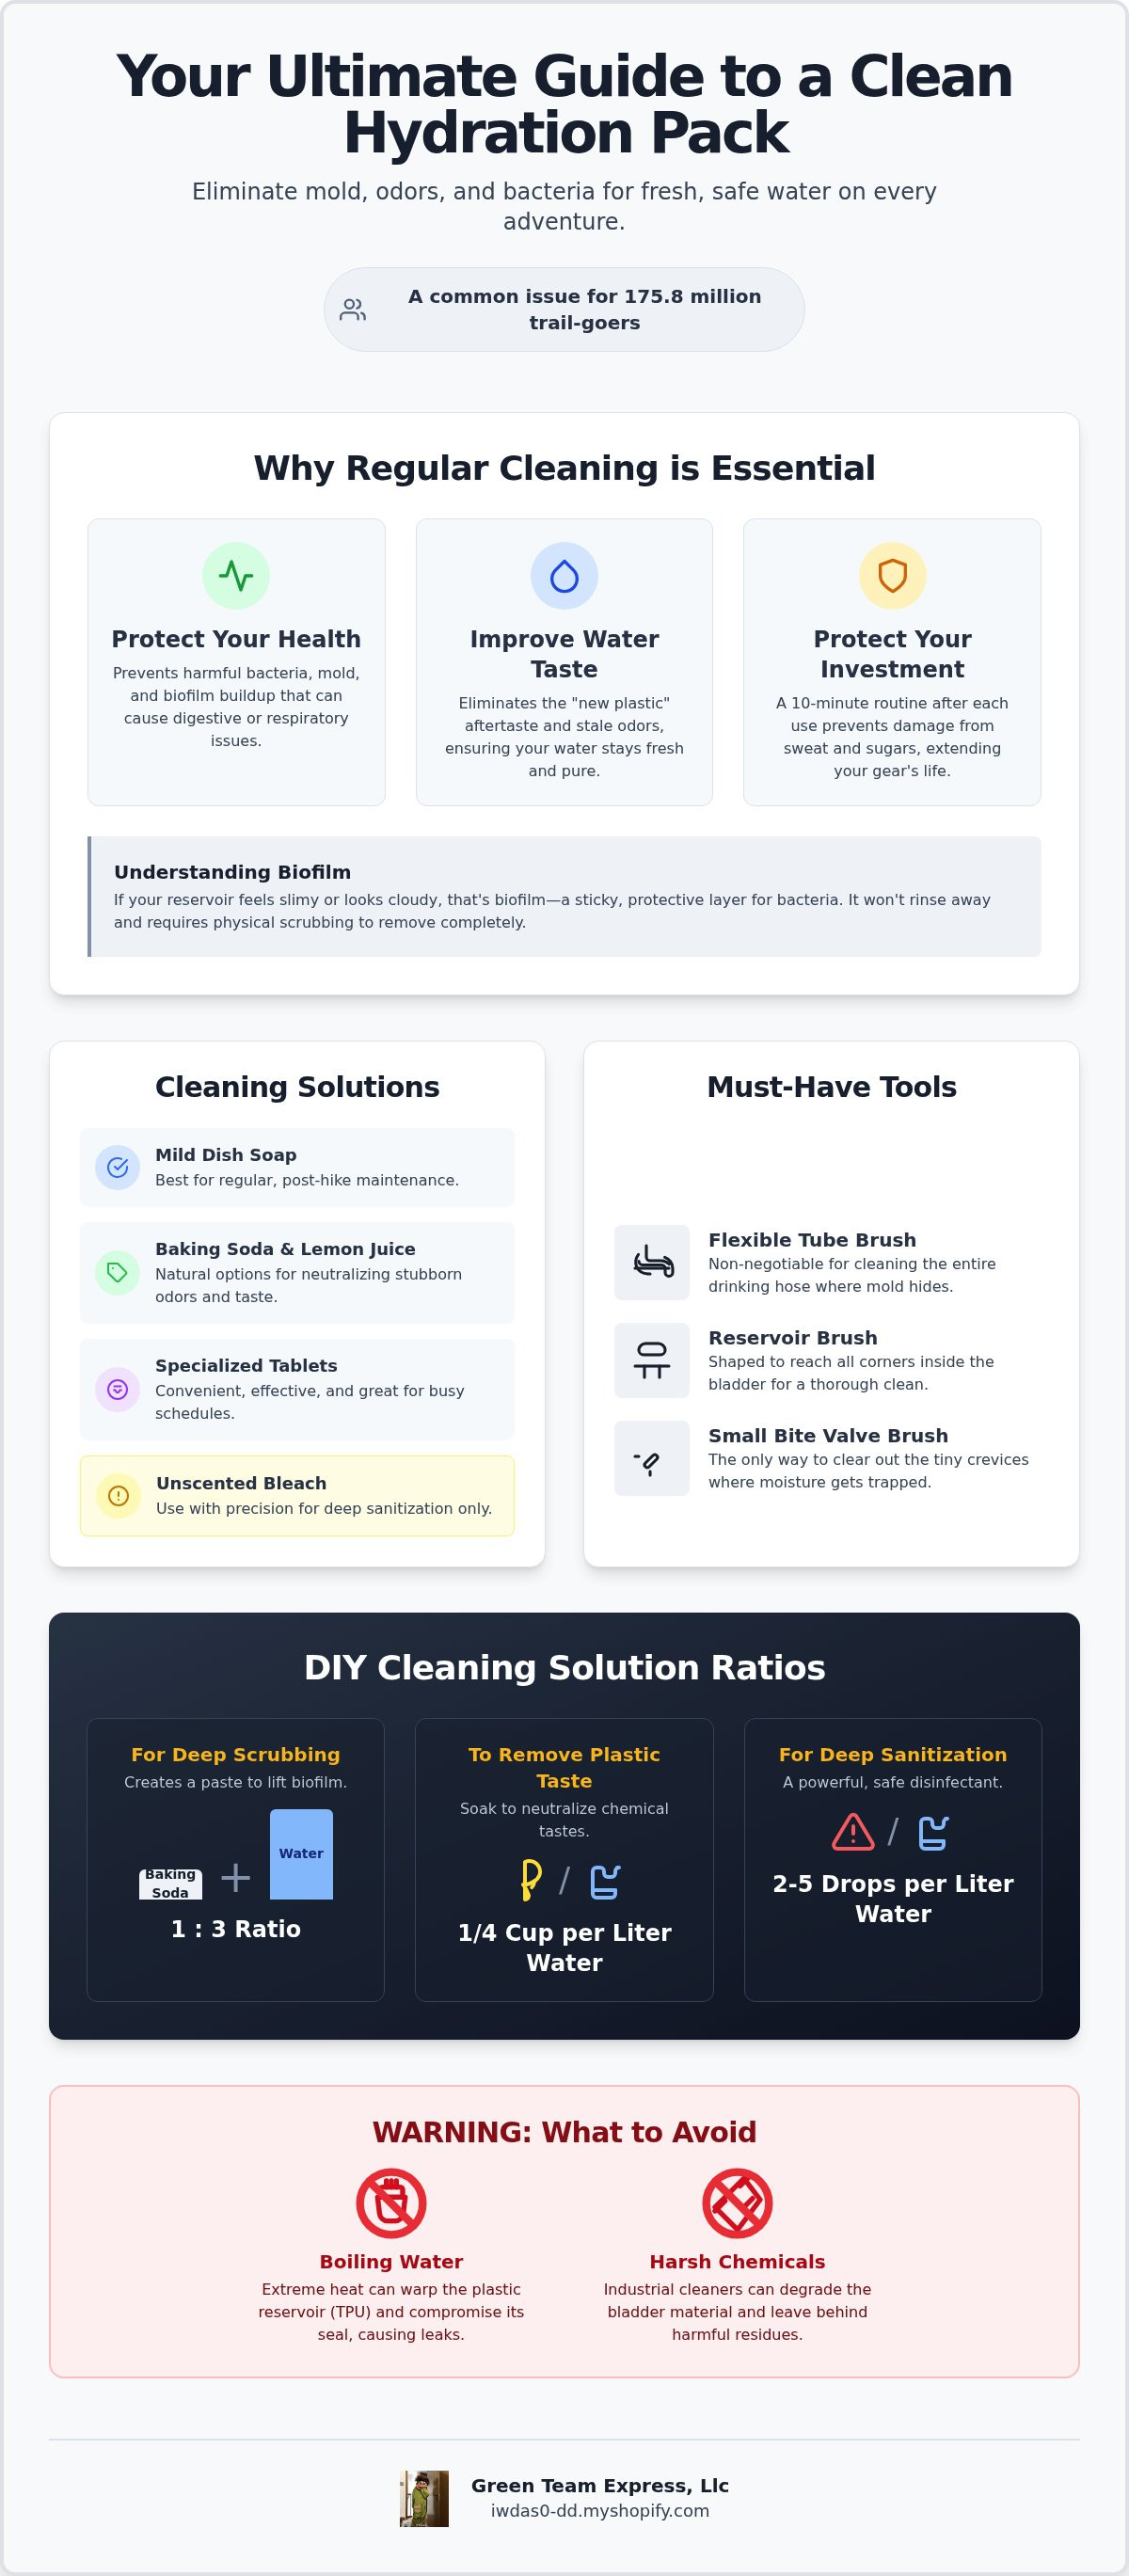
Biofilm is a protective layer for bacteria that requires physical scrubbing to remove. This sticky coating shields microbes from light rinsing, allowing them to thrive in the warmth of your pack. If left unchecked, drinking from a moldy reservoir can lead to digestive upset or even respiratory issues from inhaling spores through the bite valve. A deep clean isn't just for looks; it's about keeping your body safe while you push your limits.
Protecting Your Investment
Your Hydration Backpack Vest is a specialized find designed for durability, but it still needs attention. Salt from your sweat is a silent gear killer. It crystallizes in the zippers, making them stick or break, and it can eventually degrade the elastic mesh components that provide your comfortable fit. Proper care ensures the fabric remains breathable and the straps stay flexible for years of service.
The internal bladder is also sensitive to its environment. Residual sugars from sports drinks or exposure to heat can make the plastic brittle or permanently stained. A quick 10-minute cleaning routine after every outing saves you the cost and hassle of buying a replacement every season. By learning how to clean hydration pack components correctly, you reward your gear's utility with the longevity it deserves. It is a small investment of time that pays off in every mile you run or hike.
Essential Supplies and Cleaning Solutions for 2026
You don't need a professional laboratory to get professional results. When deciding how to clean hydration pack reservoirs, the choice usually falls between specialized kits and DIY solutions. While specialized tablets like Bottle Bright are incredibly convenient for busy weekends, you likely have everything you need in your kitchen cupboard right now. Mild dish soap is your best friend for regular, post-hike maintenance. It breaks down surface oils and sweat without leaving a heavy scent behind.
Natural alternatives like baking soda and lemon juice are fantastic for neutralizing stubborn odors. Baking soda acts as a gentle abrasive and deodorizer, while the acidity in lemon juice cuts through that "old plastic" taste. For those times you've accidentally left water in the bag for a month, deep sanitization is required. Unscented household bleach is effective, but it must be used with precision. If you're looking for gear that stands up to frequent use and cleaning, choosing a durable Hydration Backpack Vest ensures you have a reliable system for every adventure.
Protecting your equipment means knowing what to avoid. Never use boiling water or harsh industrial chemicals. Most reservoirs are made from TPU (Thermoplastic Polyurethane), which can warp or lose its seal when exposed to extreme heat. Stick to warm water and gentle agitation to keep the material flexible and leak-proof.
DIY Cleaning Solution Ratios
Precision is vital when mixing your own solutions. For a deep scrub, use a 1:3 ratio of baking soda to water to create a paste that lifts biofilm. If you're battling a chemical taste, mix 1/4 cup of lemon juice per liter of water and let it soak. When you need to sanitize, follow the bleach safety rule: use only 2 to 5 drops of unscented bleach per liter of water. This concentration is strong enough to kill bacteria but safe enough to rinse away easily.
Must-Have Tools for the Job
The right tools make the process effortless. A flexible tube brush is non-negotiable for reaching the entire length of the drinking hose where mold often hides. Dedicated reservoir brushes are shaped to reach the corners of the bag, providing better coverage than a standard bottle brush. Don't forget a small bite valve brush; it's the only way to clear out the tiny crevices where moisture gets trapped. Having these items on hand turns a daunting task into a quick five-minute routine.
How to Clean a Hydration Bladder: Step-by-Step Guide
Cleaning your hydration system is a quick ritual that ensures your next adventure is refreshing. Total disassembly is the first rule. You can't reach the hidden bacteria if the tube and bite valve are still attached. Pull the drinking hose from the bladder base and carefully remove the silicone bite valve from the plastic housing. If your system has removable seals or O-rings, set them aside for inspection. This complete breakdown gives you total access to the areas where biofilm loves to hide. It's a simple process that keeps your gear in top shape.
Once disassembled, you can focus on the soaking phase. This is when your cleaning solution does the heavy lifting. By allowing the mixture to sit, you break down the chemical bonds of stubborn deposits without needing harsh chemicals. It's the most effective way to handle a reservoir that hasn't been used in a while. Learning how to clean hydration pack components properly means being patient during these few minutes of soaking.
Deep Cleaning the Reservoir
Fill the bladder halfway with warm water and your chosen cleaning solution. Close it tight and give it a vigorous shake for about 30 seconds. This agitation helps the solution reach every surface and corner. Now, let it soak. Give it at least 20 minutes to break down stubborn deposits. Use your reservoir brush to target the bottom corners and the top seams. These are common dead zones where water doesn't flow as freely. To ensure the internal mechanism of the bite valve is spotless, squeeze the valve while flushing clean water through it to push out any trapped debris.
Sanitizing the Tube and Bite Valve
The drinking tube is often the most neglected part because it's so narrow. Use the "pull-through" method with your flexible tube brush for the best results. Insert the brush into the hose, pull it all the way through, and repeat several times until the interior looks crystal clear. If you feel resistance, don't force it; just use more warm, soapy water to lubricate the brush. This ensures you don't scratch the inner lining of the TPU material.
While you have the components apart, take a moment to inspect the O-rings for wear and tear. These tiny rubber rings prevent leaks at the connection points. Look for cracks, brittleness, or flat spots that might cause a mess during your next run. Finally, flush the entire system with cool, fresh water. Run the water through the tube and out the valve until all soap or bleach residue is completely gone. Only reassemble the system after every component is bone-dry to prevent new mold from forming inside your Hydration Backpack Vest.
The Secrets to Drying and Storage
Drying is the most critical step in the entire process. It is also the most difficult. Even after you've mastered how to clean hydration pack reservoirs, a few trapped droplets can invite mold back overnight. When the walls of the bladder stick together, moisture stays trapped, creating a perfect environment for bacteria to return. Success requires airflow and patience. You want to ensure every crevice is bone-dry before the gear is tucked away.
If you're in a rush or simply can't get every last drop out, use the "Freezer Hack." After a thorough rinse, shake out the excess water and place the clean bladder directly into your freezer. The sub-zero temperatures prevent any remaining microbes from growing. It keeps your gear fresh and ready for your next sunrise run without the stress of a 24-hour drying cycle. This is a favorite trick for daily commuters and high-mileage athletes who use their gear every single day.
Location matters just as much as technique. Avoid storing your gear in damp basements or hot garages. These environments accelerate material breakdown and encourage mildew. Instead, find a cool, dry place where air can circulate freely. If you're ready to upgrade to gear that's built for these maintenance cycles, check out our durable Hydration Backpack Vest today.
Creative Drying Hacks
You don't need expensive gear hangers to get the job done. A standard kitchen whisk is a brilliant internal spacer. Gently slide it into the bladder to keep the walls apart, allowing air to reach the bottom corners. You can also bend a plastic clothes hanger into a "V" shape for a similar effect. For those stubborn spots near the top seams, stuff a clean paper towel inside to absorb the final bits of moisture before hanging the unit upside down. It's a simple, low-tech solution that works every time.
Need it dry faster? Use a desk fan or a hair dryer, but stay cautious. Only use the cool setting on a hair dryer. High heat can warp the TPU material or damage the seals you worked so hard to protect. A gentle, cool breeze is usually all it takes to finish the job in half the time.
Long-Term Storage Solutions
Airflow is your best friend for long-term storage. Always leave the cap off or partially open. This simple habit prevents that "stale" smell from developing over the winter months. Hang the drinking tube vertically so any residual water drains out rather than pooling in the curves. A dedicated gear closet is the ultimate solution for organization. It's the perfect place to keep your heated jacket and hydration gear together, ensuring everything stays clean, dry, and ready for the next season.
Cleaning Your Hydration Backpack Vest Fabric
While the internal bladder holds your water, the vest fabric holds your effort. Sweat is more than just moisture; it is a mix of salts and body oils that can eventually degrade technical fibers. If you only focus on the reservoir, you're missing half the battle. A salt-crusted strap or a mildewed back panel can lead to skin irritation and a very short lifespan for your gear. While learning how to clean hydration pack systems usually starts with the bladder, your Hydration Backpack Vest requires its own specialized care routine to stay breathable and comfortable.
Hand washing is the gold standard for protecting the delicate mesh and elastic components. Machine washing, even on a gentle cycle, can snag the mesh or stretch the adjustable straps beyond repair. Use lukewarm water and a small amount of mild detergent to break down the grime. This simple step ensures your gear remains a "special find" that performs perfectly every time you hit the trail. It is about maintaining the utility and the novelty of your favorite outdoor equipment.
Fabric Care and Deodorizing
Focus your attention on the "hot zones" where sweat accumulates most. This includes the shoulder straps, the lumbar area, and the inner mesh panel. Use a soft-bristled brush to gently scrub these areas with a mild detergent. If you notice white, crusty lines, those are salt stains that need extra rinsing to prevent the fabric from becoming brittle. Once clean, follow the "no-dryer" rule. High heat is the enemy of elasticity. It will ruin the snug fit of your vest and can even damage the reflective elements that keep you safe during low-light runs. Always hang your vest to air dry in a well-ventilated spot away from direct sunlight.
Don't forget the hardware. Salt can cause zippers to seize up over time. A quick rinse with fresh water and a tiny drop of zipper lubricant will keep them sliding smoothly. This attention to detail prevents gear failure when you're miles away from home.
Upgrading Your Adventure Gear
Even with the best care, technical gear eventually reaches the end of its journey. Look for signs of terminal wear such as delamination, where the waterproof coatings begin to peel away like a sunburn. Permanent mold that has worked its way into the fabric fibers or leaking seams that no longer hold their shape are also clear indicators. When your gear starts to fail, it can turn a great day into a frustrating struggle. A fresh Hydration Backpack Vest improves your outdoor activities by providing a reliable, bounce-free fit that feels like a personal recommendation from a pro. Keep your kit ready for the next 2026 excursion by knowing when to maintain and when to start fresh.
Gear Up for Your Next Fresh Adventure
Mastering the art of how to clean hydration pack systems ensures every sip you take on the trail is as pure as nature intended. By committing to a thorough disassembly and prioritizing airflow during the drying phase, you protect yourself from biofilm and bacteria. Remember that maintaining the fabric of your vest is just as vital for your comfort as sanitizing the reservoir is for your health. Proper care rewards you with gear that performs reliably for years.
We pride ourselves on being a trusted source for functional lifestyle gear that solves real problems. Our equipment is designed for high-performance outdoor use and features easy-to-clean materials for long-term hygiene. Don't let a moldy tube slow you down. Explore our durable Hydration Backpack Vest for your next adventure and experience the difference that quality equipment makes. Your future self will thank you when you're miles into the wilderness with a crystal-clear water supply. Stay hydrated, stay safe, and enjoy every mile ahead.
Frequently Asked Questions
Can I put my hydration bladder in the dishwasher?
No, you should never put your hydration bladder in the dishwasher. The intense heat of the drying cycle can warp the Thermoplastic Polyurethane (TPU) material and compromise the integrity of the welded seams. Dishwasher detergents are often too abrasive for the delicate seals and O-rings. Stick to hand washing with warm, soapy water to ensure your gear remains leak-free for years of outdoor adventures.
How often should I clean my hydration pack if I only use water?
You should rinse your reservoir after every single outing, even if you only use plain water. While water seems clean, moisture left in a closed system quickly leads to biofilm buildup. Learning how to clean hydration pack systems involves knowing the right frequency for your activity level. Aim for a deep sanitization once every two to four weeks depending on how often you hit the trails.
What is the best way to remove a permanent plastic taste from a new pack?
The most effective method is a soak with lemon juice and warm water. Mix 1/4 cup of lemon juice per liter of water and let it sit in the reservoir for about 30 to 60 minutes. This natural acidity neutralizes the manufacturing residues that cause that "new plastic" tang. Rinse it thoroughly afterward. This simple trick ensures your first sip is as refreshing as your last.
Is it safe to use boiling water to sanitize my hydration reservoir?
Boiling water is not safe for most hydration bladders. Extreme temperatures can melt the plastic, damage the internal baffles, or cause the drinking tube to lose its shape. Most manufacturers recommend a maximum water temperature of 60 degrees Celsius or 140 degrees Fahrenheit. If you need to sanitize, stick to the bleach or baking soda methods discussed earlier to keep your system safe without risking a melted mess.
How do I get rid of black mold spots in the drinking tube?
To eliminate black mold, you must use a flexible tube brush combined with a mild bleach solution. Physical scrubbing is necessary because mold creates a protective layer that rinsing alone won't touch. Soak the tube in a mixture of 2 to 5 drops of bleach per liter of water for 20 minutes. Use the brush to reach the spots, then flush repeatedly with fresh water until the scent is gone.
Can I store my hydration pack in the freezer between uses?
Yes, storing your clean, wet reservoir in the freezer is a brilliant way to prevent bacterial growth. Microbes cannot thrive in sub-zero temperatures, making this an ideal solution for daily athletes. Just ensure the bladder is empty of large amounts of water to prevent ice expansion from stressing the seams. When you're ready for your next excursion, simply take it out and fill it up for an extra-cool start.
Can I use denture cleaning tablets to clean my water bag?
Denture cleaning tablets are a fantastic, cost-effective alternative to specialized reservoir tablets. They're designed to kill bacteria and remove odors without using harsh chemicals that might damage the TPU material. Drop two tablets into a full reservoir and let them fizz for 15 to 30 minutes. This is a clever way to learn how to clean hydration pack reservoirs when you're traveling and don't have your full brush kit.
How do I clean my hydration pack after using electrolytes or sports drinks?
You must clean your pack immediately after using sugary drinks or electrolytes. Sugars act as fuel for mold and bacteria, causing them to grow much faster than with plain water. Use warm water and a mild dish soap to scrub the bladder and the drinking tube thoroughly. Pay extra attention to the bite valve, as sugar residues can make the mechanism sticky or prevent it from sealing properly.